As it turns out this is my 100th post. The first one was published in March 2011 and a lot has changed since then. A lot of new technologies have come in and a lot of my posts have become obsolete. In all these years nothing has created more impact for me than Docker and Kubernetes. Both these technologies have revolutionized the way I work.
In this special 100th post we will setup a solid Kubernetes cluster that we can use in most projects with ease. The main objective for me is to create the most secure and scalable setup possible. For example, the nodes should not be accessible from the internet (as far as possible) and they should be managed via an Auto Scaling Group among other things.
So let's get started, we will try and stick to the command line most of the time and keep it simple and minimal. As pre-requisites we only need -
The AWS CLI setup should be configured to an IAM account that has full administrative access (makes life easier) and finally we also need a fully managed AWS Route53 domain also under this account. Please note that this domain can be different than the final production application and it doesn't matter what domain we use here. This is will be the domain we use to connect to the Kubernetes API and it can host any application we want with any domain.
At this point I assume AWS CLI and Kops are in your PATH and working. Also decide on the Kubernetes cluster managment domain e.g. k8-0405.rockyj.de, again this could be anything but the root domain (rockyj.de here) should be fully managed by Route53.
Step 1 - Setup new AWS VPC
This is actually an optional step, but I do this to have complete control on the cluster. This step creates an AWS VPC in a specific region (e.g. eu-central-1) with two subnets - 1 Public and 1 Private. The public subnet is reachable from the internet and the private subnet is erm.. private, it can call out to the internet but is inaccessible directly from outside (thus making is more secure).
Using my ansible-script https://github.com/rocky-jaiswal/ansible-aws-vpc this whole setup is a matter of filling in entries in a YAML file and running a shell script.
The most important thing is to check the VPC + subnet ids and the tags of the subnets and routing tables. The tag KubernetesCluster => Cluster Name (e.g. k8-0405.rockyj.de) should be present on subnets and routing tables. The Ansible script will automatically do this tagging for you.
Step 2 - Setup kops
Create an S3 bucket, this is used to store the cluster templates. e.g. -
aws s3api create-bucket \
--bucket k8-state-03april2017-v4 \
--region eu-central-1 \
--create-bucket-configuration LocationConstraint=eu-central-1
Now the most important command, we setup kops so that we get all nodes in the private subnet and we use the VPC we created in step 1. e.g. -
kops create cluster \
--zones eu-central-1a \
--topology=private \
--networking=calico \
--master-size=m3.medium \
--node-size=m3.medium \
--bastion \
--state=s3://k8-state-03april2017-v4 \
--vpc=vpc-b748c9df \
--network-cidr=10.0.0.0/16 \
k8-0405.rockyj.de
The values in the command above can be changed depending on your new VPC setup and preferences (specially the VPC Id). You can read the reference here.
At this point we need to check and make minor modifications to the cluster, since everything is not possible from the create command. Run -
kops edit cluster k8-0405.rockyj.de --state=s3://k8-state-03april2017-v4
This will open the cluster configuration in an editor. We need to delete the prefilled CIDRs, and replace them with the subnet IDs, the utility subnet will be the public subnet and other one private. You can get these values from the AWS console.
Check the configuration to make sure all looks fine and run -
kops update cluster k8-0405.rockyj.de --state=s3://k8-state-03april2017-v4 --yes
Things will take a while and hopefully in a matter of 10 minutes we will have a new cluster ready to go. The step that takes most time is DNS propagation which cannot happen soon enough.
You can validate the cluster with -
kops validate cluster k8-0405.rockyj.de --state=s3://k8-state-03april2017-v4
All should be fine, or wait for a few more minutes. Then get the kubeconfig file from its default location -
mv ~/.kube/config ./kubeconfig
kubectl --kubeconfig=./kubeconfig get nodes
At this point we should have a working cluster, with all nodes living in private subnet. All management is possible with kubectl and the precious kubeconfig file. Keep this file extremely safe since this is the key to the whole cluster.
Step 3 - Install a service
To test the Cluster setup we can now deploy a simple NGINX service. I have create a lot of sample configurations here, feel free to copy them.
Creating a new service could be like -
kubectl --kubeconfig=./kubeconfig apply -f services/app/simple-web.yml
This will create a K8 deployment, a service and expose it via AWS ELB all in one go. Kubernetes is pretty amazing this way! Wait for a while, then to view the ELB URL run -
kubectl --kubeconfig=./kubeconfig describe service simple-web
And you can open the URL in the browser once the service and ELB are healthy (~5 mins). That's it, we are now set to create and deploy services at will.
Next up, we will setup centralized logging.
Setup ELK
With such a distributed setup and potentially scores of services on dozens of nodes, it is extremely important to have centralized logging. ELK is a wonderful tool for this.
There are a few pieces to this, the Kubernetes services / deployments should themselves log to stdout/stderr, fluentd will then pick the logs from each physical node and post them to the configured ElasticSearch server, finally we can view the logs on Kibana which again is connected with the same ElasticSearch server. So we need the perfectly synchronized configuration for all the 3 components here.
Fortunately, most of the hard work is done for us by the Kubernetes team and other developers, I just chopped and changed the configuration and created the right combinations. Now, we just need to download and apply these definition files. You can get them from my repository mentioned above. To get ElasticSearch, fluentd and Kibana running we need to run (in this order) -
kubectl --kubeconfig=./kubeconfig apply -f services/k8/k8-es-simple-service.yml
kubectl --kubeconfig=./kubeconfig apply -f services/k8/fluentd-ds.yml
kubectl --kubeconfig=./kubeconfig apply -f services/k8/es/7-kibana-service.yml
Just make sure that the files have the right environment variables, it takes a short while for everything to synchronize and for Kibana to start. We have created all these services in the kube-system namespace to avoid any clashes with our application namespace. You can check the logs of the pods themselves by (for example) -
kubectl --kubeconfig=./kubeconfig logs kibana-logging-1071094636-brspv --namespace=kube-system
After ~10 minutes all pods should be humming smoothly. To view kibana, run -
kubectl --kubeconfig=./kubeconfig proxy
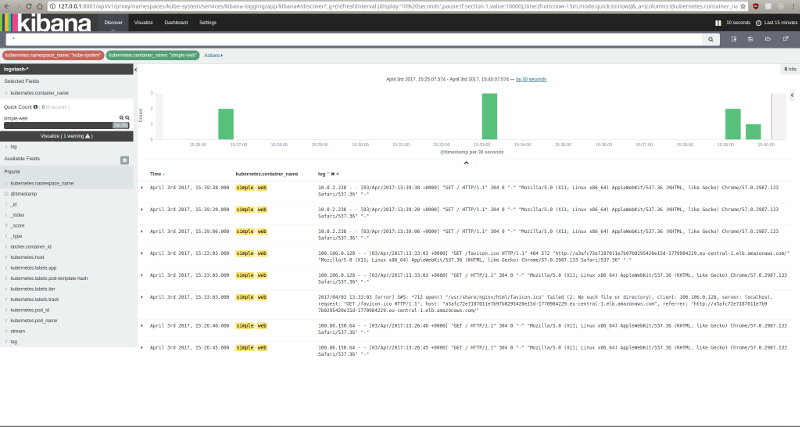
This runs a local Kubernetes proxy server and Kibana UI can be accessed at - http://localhost:8001/api/v1/proxy/namespaces/kube-system/services/kibana-logging
And you should see the logs in Kibana.
K8 also provides a nice dashboard, you can get it by running -
kubectl --kubeconfig=./kubeconfig apply -f services/k8/k8-dashboard-service.yml
And the dashboard is visible via the proxy at http://localhost:8001/ui
To be continued
The ELK stack is all based on non-persistent state, so if the ElasticSearch pod goes down we will lose all historical logs. In my next blog we will look at making this setup more robust. For now we have a solid, secure Kubernetes cluster with working ELK. Have fun!