Introduction
Back in the day running side projects was easier, we bought a server, then installed Ruby and Postgres on it and boom the server was ready for deployment. Then we used good old Capistrano to push the newer versions of the application to the server somehow. Trouble came when new Ruby versions were released and then we had to update the servers and so on. Lately, with SPA gaining popularity, setting up the rapidly releasing Node.js based projects (with backend and frontend) can be very challenging and time consuming if not done right. Thankfully with Docker one should not be worried about installing anything on the server. Just install docker, then package and run everything as a docker container. But still the question remains how to do CI/CD with these docker containers given the fact that side projects usually are running on single low powered machines.
Scale and economics
The idea of this blog is to demonstate a simple, low ceremony, free CI/CD setup based on docker / docker-compose that I have concoted. Ofcourse, this is not meant for serious or enterprisey projects which need scale & security but small setups like this very blog. The annual running cost of this whole setup is around $185 annually based on -
- Domain name (annual fee): from $2 to whatever the price of your domain is
- Server (monthly fee): from $5 to $25, I recommend Hetzner or DigitalOcean
While this setup is simple, if later you want to scale this up, docker-compose can be replaced with Kubernetes easily while a lot of principles will remain the same.
Software and tooling
To stick to our plan of minimum fuss / maintenance, ideally all we want / need on any server is only -
- docker
- docker-compose
- nginx
- let's encrypt "certbot" for HTTPS (because who build anything without HTTPS these days)
Why nginx? Any web facing docker service we build will be proxied by the nginx running on the host to provide HTTPS (with let's encrypt certificates) this also ensures a single point of entry on the server. We will also install a "deployer" service but more on that in a moment.
Since this is a simple, single server setup we will use Ansible to install the necessary software there. The Ansible setup is available here.
Gitlab.com provides free private projects and CI (2000 minutes a month) so we will use them for code hosting, CI as well as use their free docker registry.
Core Principle
The main idea of this setup is -
- The server has nothing but nginx and docker-compose installed (plus a thin "deployer" service used in point 5 below)
- All our containers are run via docker-compose
- We build all our containers with free Gitlab CI
- We will publish our containers on the cost-free Gitlab docker registry
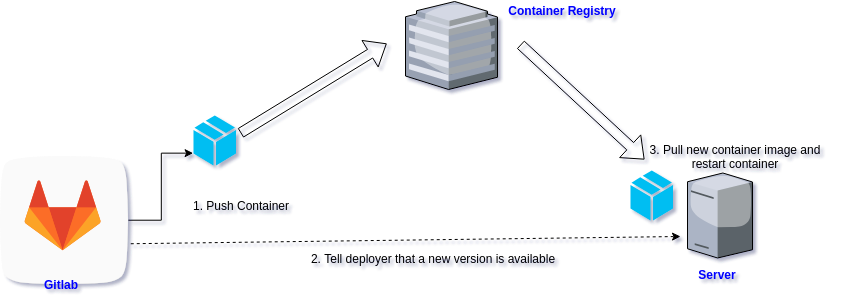
- When we run a new build, we will "inform" our server that a new container is available (this is the HTTP interface that "deployer" provides).
- The server will then pull this new container image and restart the container with the new image.
To illustrate -
Part 1 - Stepup the server
The server setup can be divided into 2 parts -
- Initial setup with manual steps e.g. buying the server, domain etc.
- Initial automated setup with Ansible
So let's get started with the manual steps -
- First step is of-course to get a server from Hetzner or Digitalocean.
- Make sure you select Ubuntu 18.04 and you can SSH into it
- Make sure the base repos and kernel is updated before we start
- If you do not have non-root SSH access, you can create a sudo user with these (sample) simple commands -
- adduser rockyj
- usermod -aG sudo rockyj
- Copy your SSH key for rockyj user
- Buy your domain and in the "DNS A Records", give the IP of the newly created server (takes some time to replicate)
- On the server with root or sudoer, run -
- cd /etc/ssl/certs
- sudo openssl dhparam -out dhparam.pem 4096
- We need this file for HTTPS setup later, this is also a time consuming process (10-15 mins) so a good time to check youtube
Now let's setup the software needed on the server with Ansible (we need some preparations for the Ansible run though) -
- Checkout the sample ansible project
- Update the hosts file to the IP of the new server and update the domain variable value in main.yml to your domain
- Now one tricky bit, since we do not have the necessary certificates from Let's Encrypt, comment 3 lines in "roles/nginx/templates/app.conf.j2" where Let's Encrypt certs are listed. We will get them in a short while.
- The ansible dcompose role also contains our main project's "docker-compose.yml" file. Have a look at the sample file, and change it as per your project needs. docker-compose may not work now since our docker images are not yet published so we will need to update this file in any case.
- Run "./setup_server.sh", you will be asked for your user's sudo password.
- SSH into the server to get the Let's Encrypt certs now -
- sudo certbot --nginx certonly
- Now that we have the necessary certs, we can uncomment the 3 line in nginx app.conf.j2 file and run "./setup_server.sh" again
We now have our base setup ready, if you browse to your domain with https you should see an nginx error page since it cannot proxy to any container. So now, let's start building those containers.
Part 2 - Building containers on Gitlab
Technically this is very simple, we create a .gitlab-ci.yml file to describe our CI/CD process. A few points to note, since Gitlab CI also runs in a docker container we need a docker-in-docker (dind) setup to build our images. To push our containers via the API, we need to create an API token in Gitlab. We will save this as a secure variable in our CI process. The second secure variable we need is the HTTPS Basic token to contact the deployer service on our server. A self explanatory, sample YML file would look like (taken from this very blog) -
---
# .gitlab-ci.yml
image: ruby:2.3

stages:
  - build
  - docker
  - deploy

build:
  stage: build
  artifacts:
    paths:
      - ./build
  script:
    - bundle install --deployment
    - bundle exec middleman build

docker:
  stage: docker
  image: docker:git
  services:
    - docker:dind
  dependencies:
    - build
  script:
    - docker login registry.gitlab.com -u rocky-jaiswal -p $GITLAB_TOKEN
    - docker build -t registry.gitlab.com/rocky-jaiswal/my_blogs:$CI_COMMIT_SHA .
    - docker push registry.gitlab.com/rocky-jaiswal/my_blogs:$CI_COMMIT_SHA

deploy:
  stage: deploy
  script:
    - 'echo "{\"service-name\": \"my_blogs\"," > body.json'
    - 'echo "\"image-path\": \"registry.gitlab.com/rocky-jaiswal/my_blogs:$CI_COMMIT_SHA\"}" >> body.json'
    - 'cat body.json'
    - 'curl -X PUT https://rockyj.in/__deployer/service -H "Authorization: Basic $DEPLOYER_AUTH" -H "Content-Type: application/json" --data @body.json'
The 3 step process here is simple -
- Run tests & build the project
- Build a docker image and push it to the gitlab registry
- Tell "deployer" service about this newly built image (with a curl request on the deployer)
Part 3 - Tying it all together
We now have a server with all the packages we need plus we also have a CI process so let's tie it all together. Since we do not have docker-compose running on the server (so far) comment the last line of the .gitlab-ci.yml file.
We also do not know our container image ids to start docker-compose so we have a chicken-egg problem. This is an easy fix, you can now set the container versions by checking your project's git commit SHA and updating your docker-compose .env file directly so that we know which container image to pull.
Once we know this we can update our .env file with the image names and start the docker-compose process with -
docker-compose up --build --detach
The thing to remember here is - To ensure easy deployments we inject the container versions as environment variables. So when new containers are built we just update the .env file and restart the container (this is exactly what "deployer" service does). So for the initial setup, we need to manually read the git SHA and update the .env file. Please note that this is only needed once for the first time deployment.
Part 4 - Nginx and Deployer
With the docker-compose setup running, we can uncomment the last line of our .gitlab-ci.yml file and push to our hearts content. Each time the deployer service essentially takes in the new container image and runs a simple script -
#!/bin/bash

cd /home/rockyj/app
cat ./.dockercreds | docker login registry.gitlab.com --username rocky-jaiswal --password-stdin

SERVICE_NAME=$1
IMAGE_PATH=$2

IMAGE_NAME+="${SERVICE_NAME^^}_ID"
OLD_IMAGE_VERSION=$(grep "$IMAGE_NAME" /home/rockyj/app/.env | awk -F "=" '{print $2}')
NEW_IMAGE_VERSION=$(echo $IMAGE_PATH | awk -F ":" '{print $2}')

# echo $SERVICE_NAME
# echo $NEW_IMAGE_VERSION

docker pull $IMAGE_PATH && \
sed -i "s/$OLD_IMAGE_VERSION/$NEW_IMAGE_VERSION/g" /home/rockyj/app/.env && \
docker-compose stop $SERVICE_NAME && \
docker-compose up --no-deps --detach $SERVICE_NAME
Using these simple commands, we restart the container with the new image. So the deployer is essentially a HTTP wrapper over this script. The deployer app is written as a REST service in Clojure and also provides BASIC authentication to protect it from unwanted invocations.
Finally, the nginx app.conf file proxies our services running on docker-compose. Using Ansible you can change it according to your project needs, just keep the deployer section as is. The deployer code is available here - https://gitlab.com/rocky-jaiswal/deploy-app.
Final thoughts
The initial setup might seem a bit complex, but in the long run this setup is very easy to maintain. Since the server has hardly any packages, upgrades or moving to a new provider is easy. The services run without any problem and releasing a new version is as simple as doing a git push origin master. That's it! Hope this is useful for you in some way.